Sendbird Push Noti 연결하기
Posted on 2021-10-26 by GKSRUDTN99
Swift&Xcode
Xcode
Chat
1. APN Certificate 만들기
- '키체인 접근' 열기
- 상단 메뉴바에서 키체인 접근 > 인증서 지원 > 인증 기관에서 인증서 요청 선택

- 사용자 이메일 주소에는 자신의 Apple Developer 계정을 넣고, 요청 항목은 '디스크에 저장됨'을 선택하여 계속
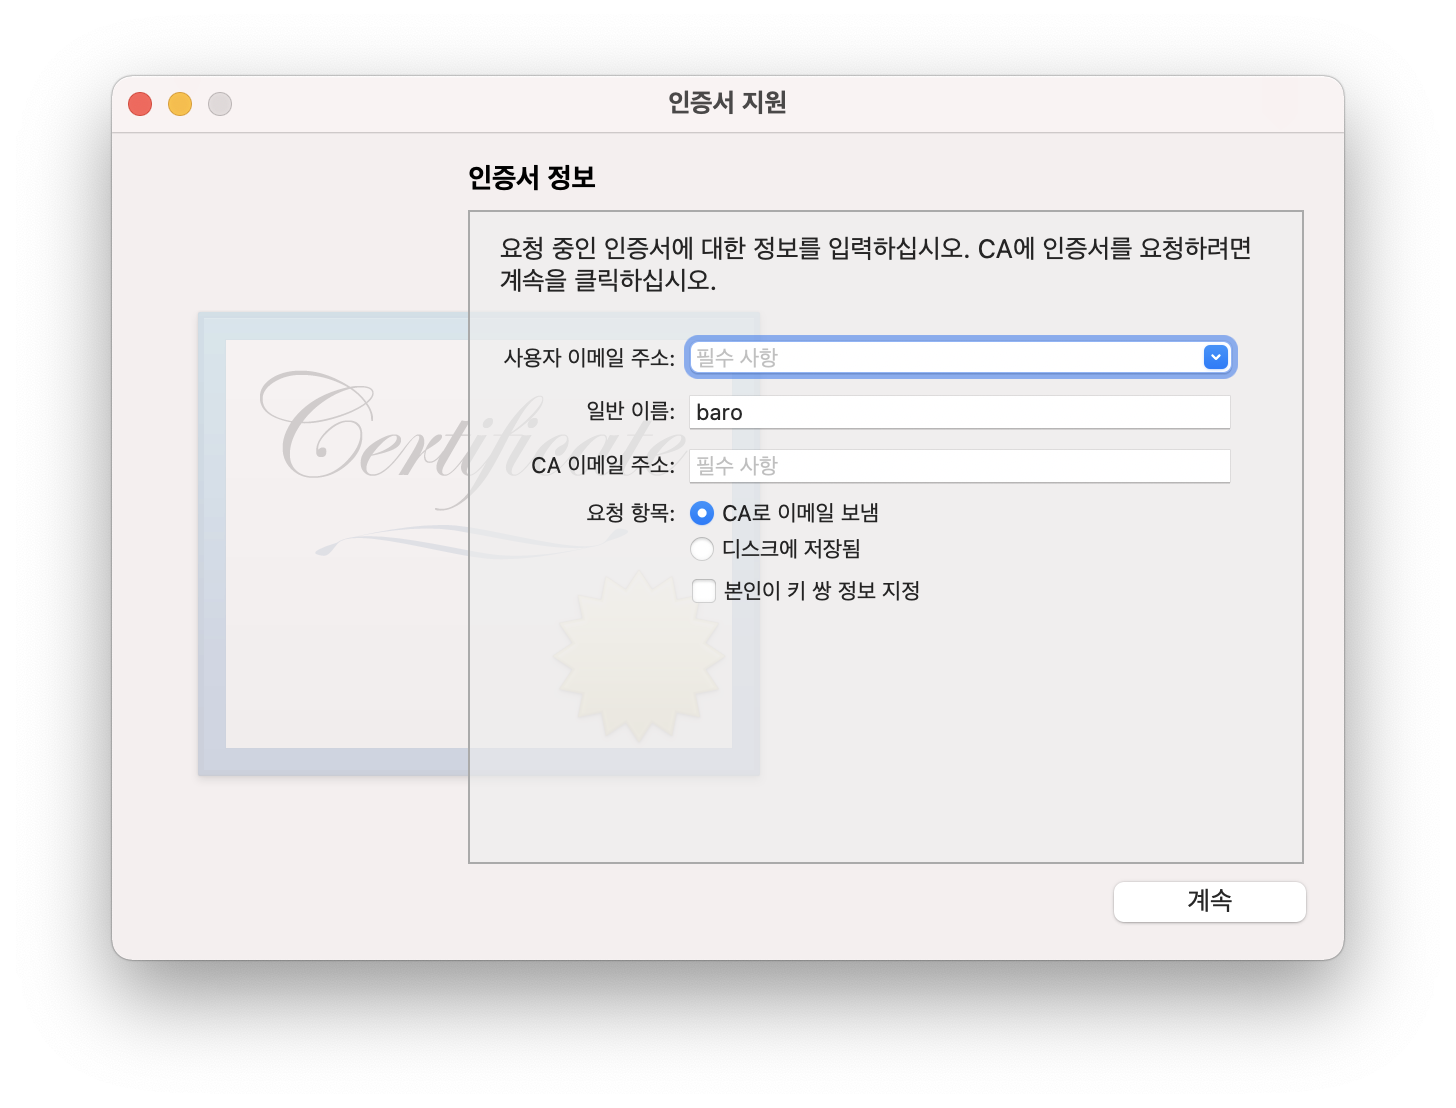
- '.certSigningRequest'파일을 적당한 곳에 저장한다.
- 'https://developer.apple.com/account/resources/certificates/list' 에 접속하여, 로그인 한 뒤, 우측 상단에서 앱을 소유하고 있는 팀으로 변경한다.
- 왼쪽에서 'Identifiers'탭을 선택한 뒤에 APN Certificate를 만들 앱을 선택한다.
- App Id Configuration 창에서 Push Notifications를 체크한뒤, 우측에 'Edit'또는 'Configure' 버튼을 선택한다.
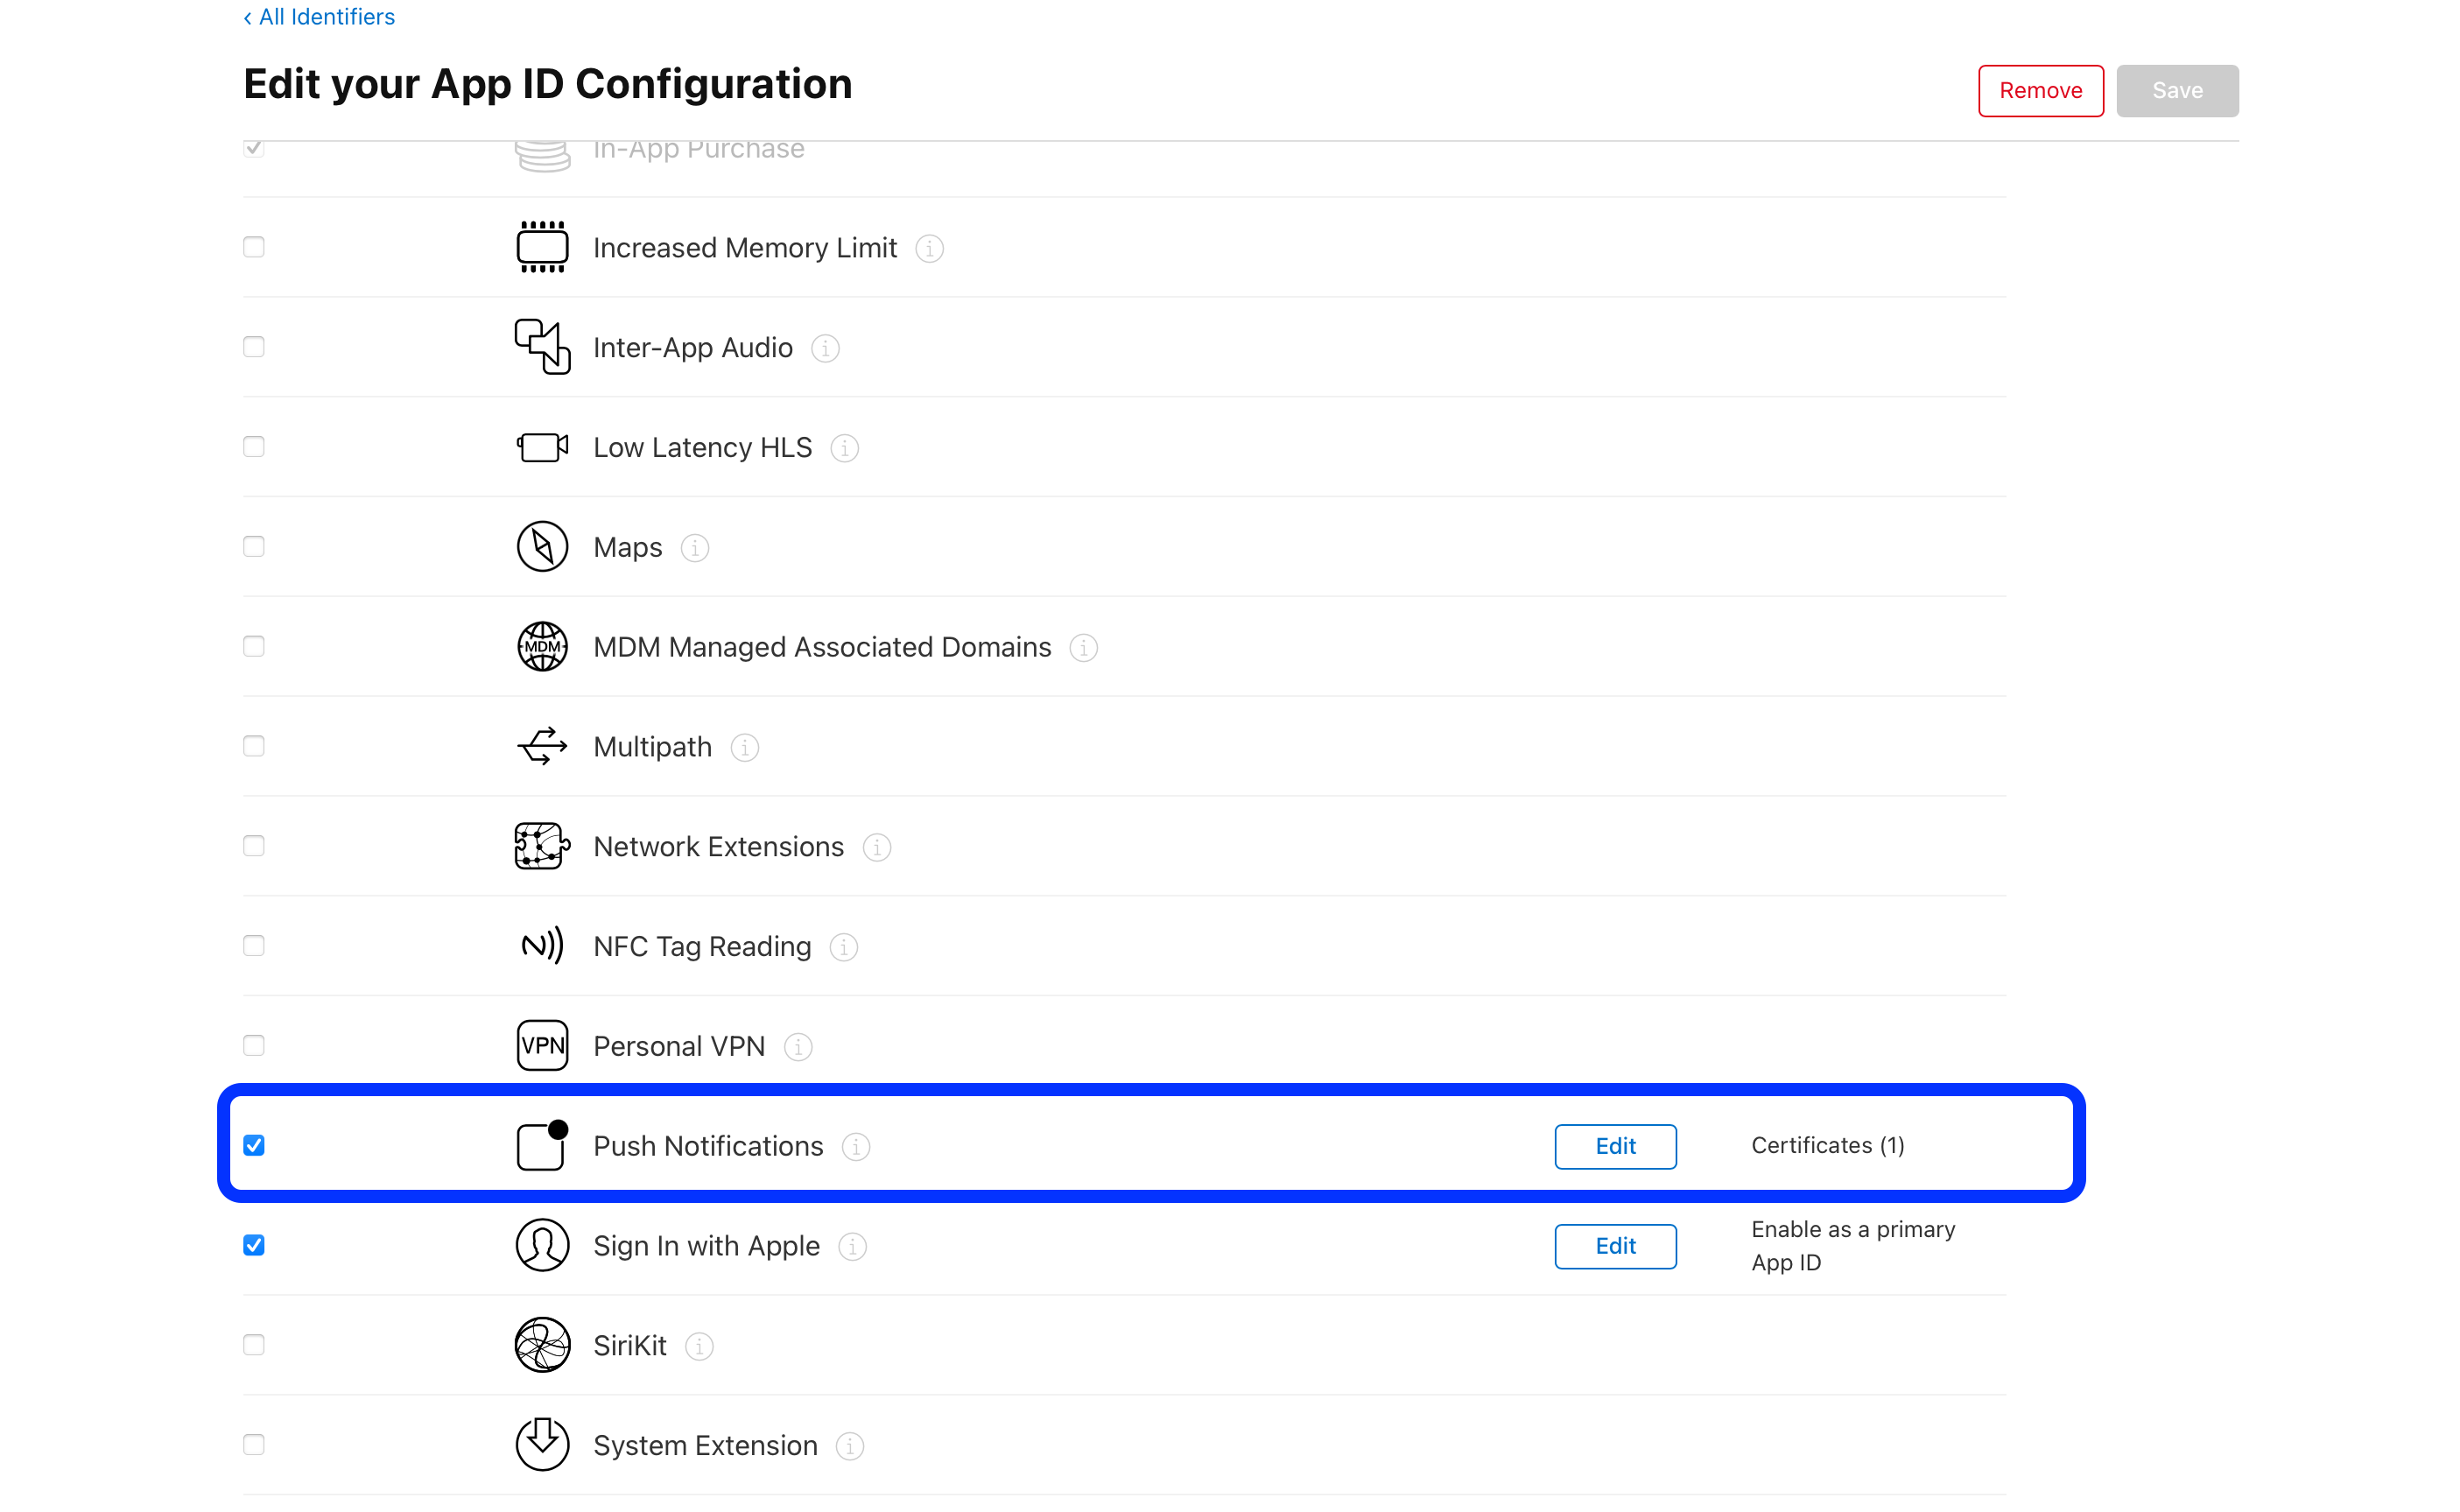
- 앱의 Identifier에 맞게 Dev 또는 Prod를 선택하여 'Create Certificate' 버튼을 선택한다.

- 이어 나오는 화면에서 'Choose File'을 선택한 뒤 앞서 만들었던 '.certSignRequest'파일을 선택한 뒤 'Continue'버튼을 선택한다.
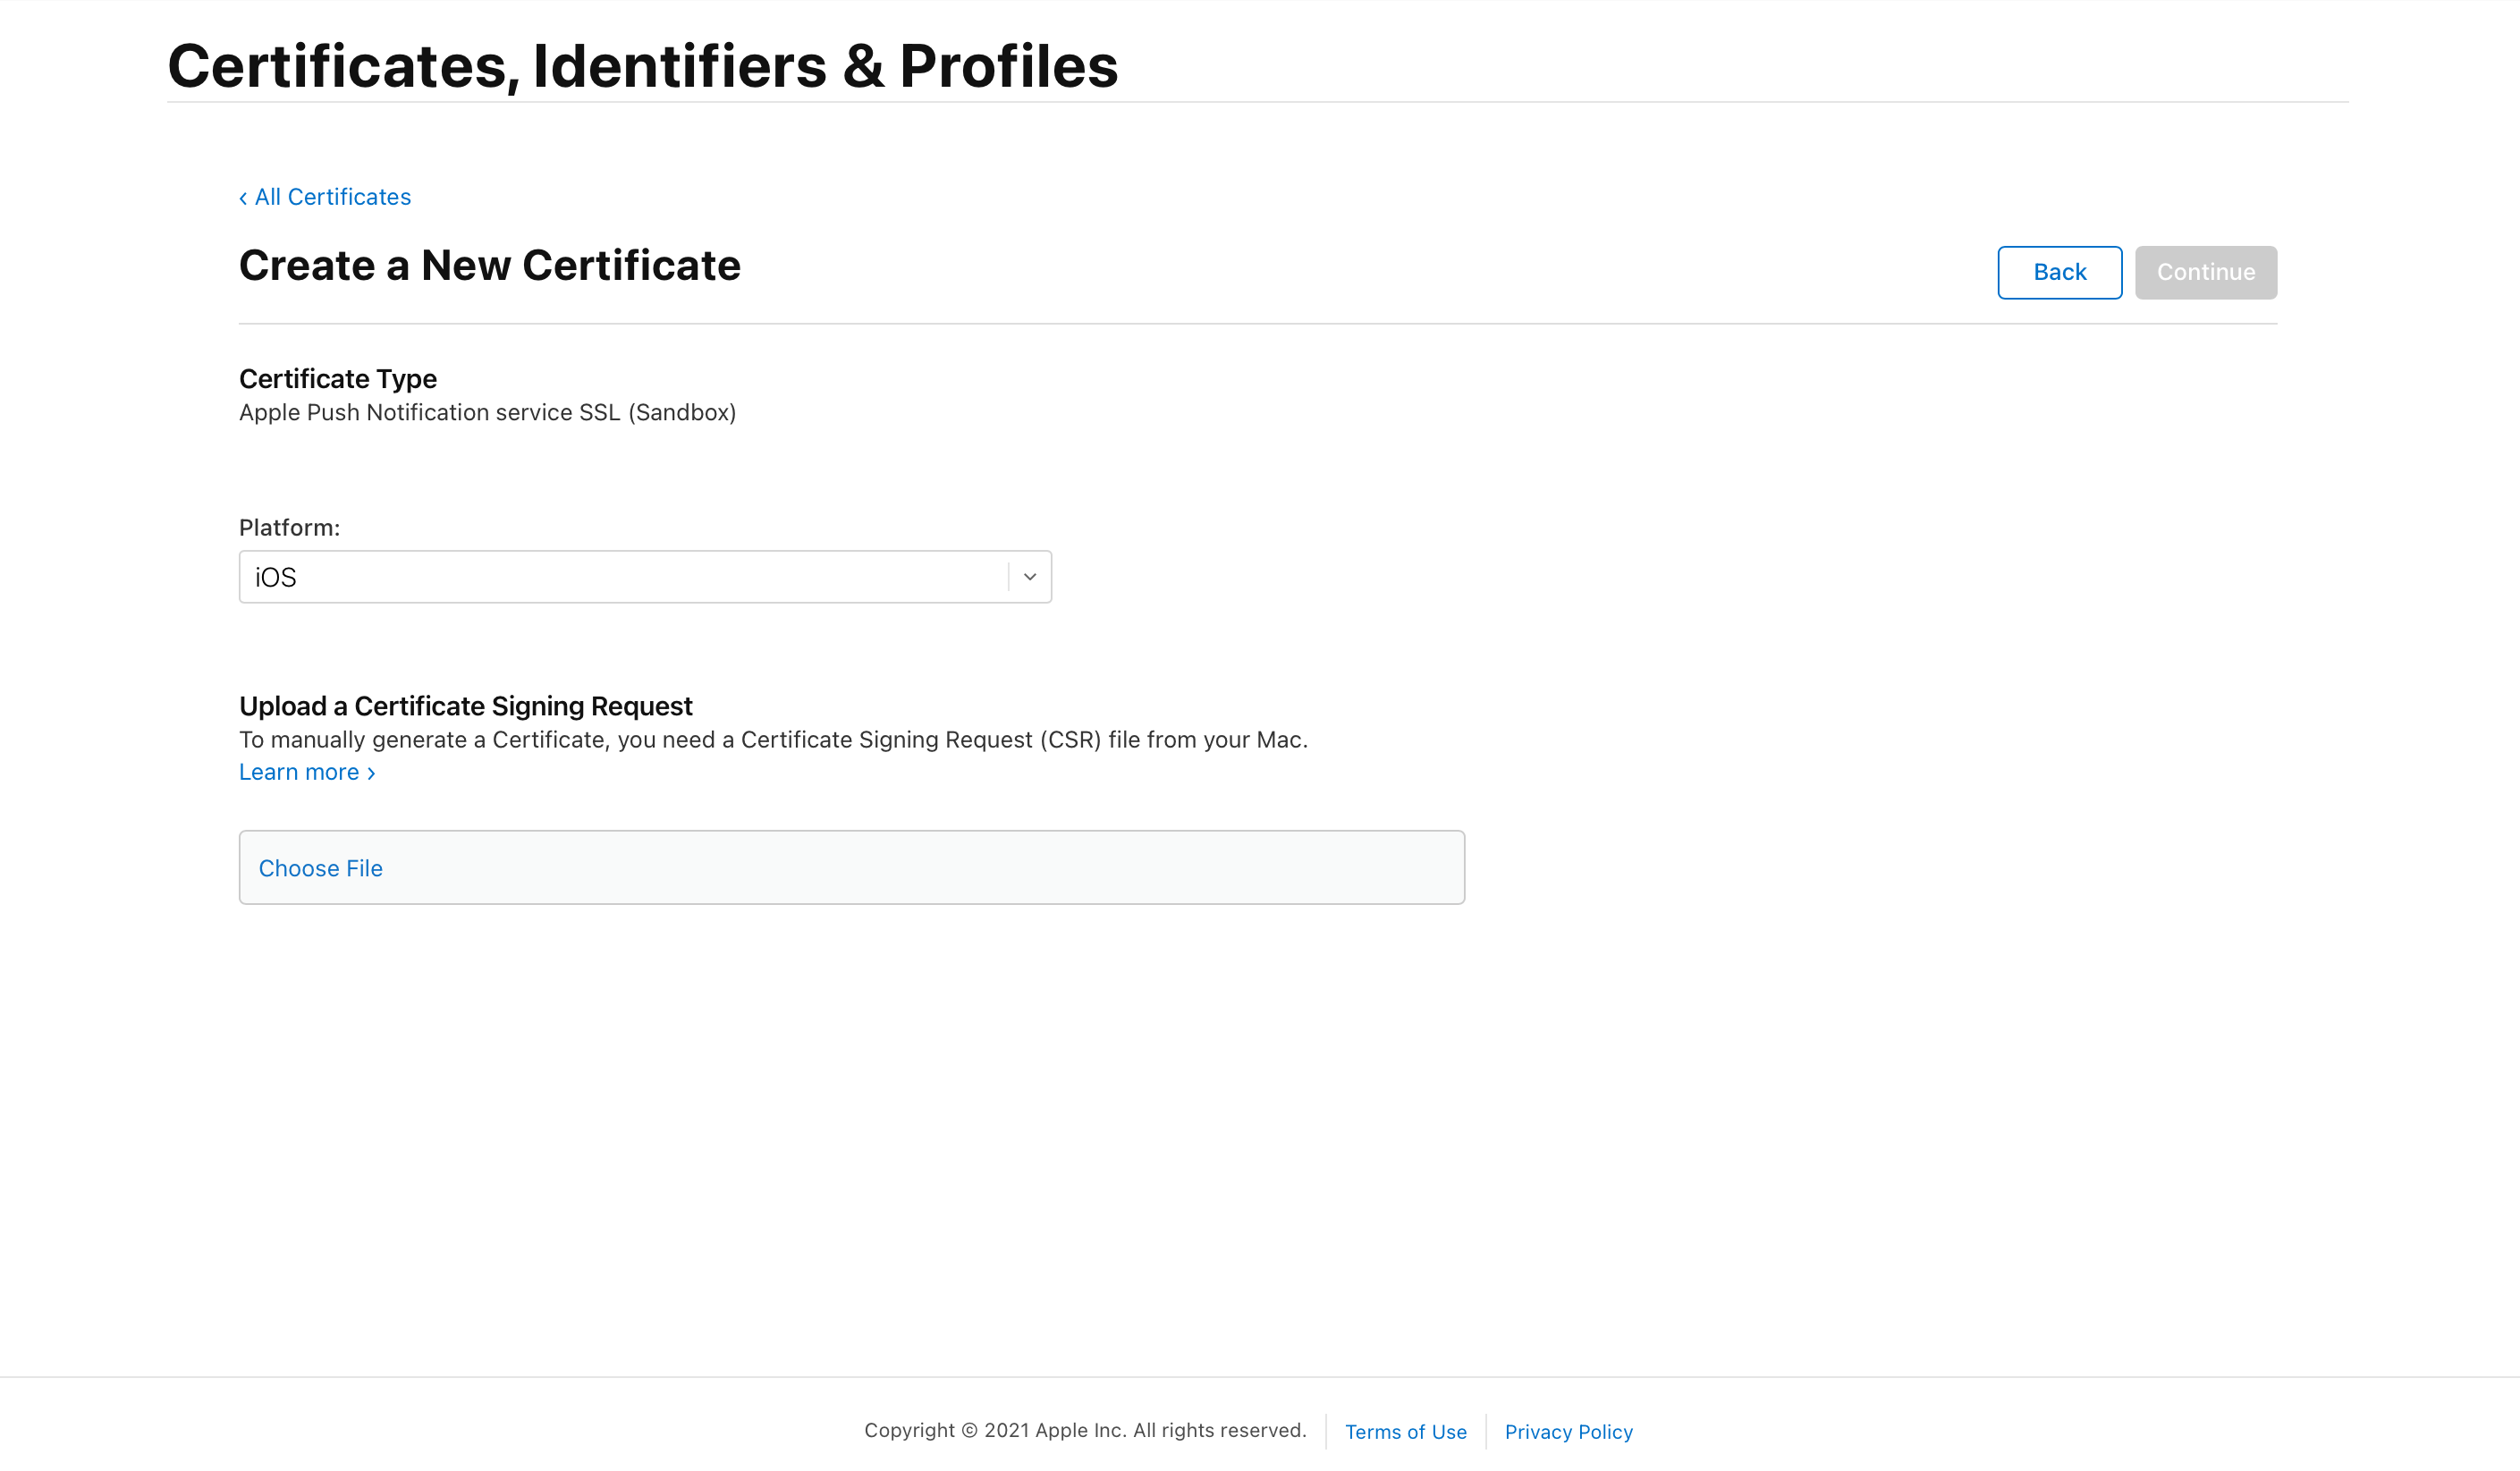
- 다음으로, 'Download' 버튼을 선택하여 APN Certificate를 다운로드 받는다.
2. APN Certificate .p12 파일로 내보내기
- 앞에서 내려받은 APN Certificate를 더블클릭하여 키체인에 등록한다.
- 좌측 메뉴에서 '로그인'을 선택한 뒤, 상단 메뉴들 중에서 '내 인증서'를 선택한다.
- 'Apple Development IOS Push Services: (App Identifier)' 이름을 가진 인증서의 왼쪽 '>' 모양을 눌러 개인키가 보이도록 펼친다.
- 인증서와 개인키를 같이 선택한 뒤, 오른쪽 클릭하여 '2개 항목 내보내기'를 선택한다.

- .p12 파일을 적절한 곳에 저장한다.
- 이때, 내보낸 항목을 보호하는 데 사용할 암호를 입력하라고 하는데, 입력하지 않고 확인을 누르고 넘어가도 된다.
3. .p12 파일 Sendbird에 등록하기
- 'https://dashboard.sendbird.com/' 를 열어 샌드보드 대쉬보드에 접속한다.
- 좌측 상단에서 앱을 선택한다.
- Settings > Chat > Notifications로 들어간다.
- 'Push notifications credentials'탭을 찾아, 애플 아이콘 옆에 있는 'Add credential'을 클릭한다.
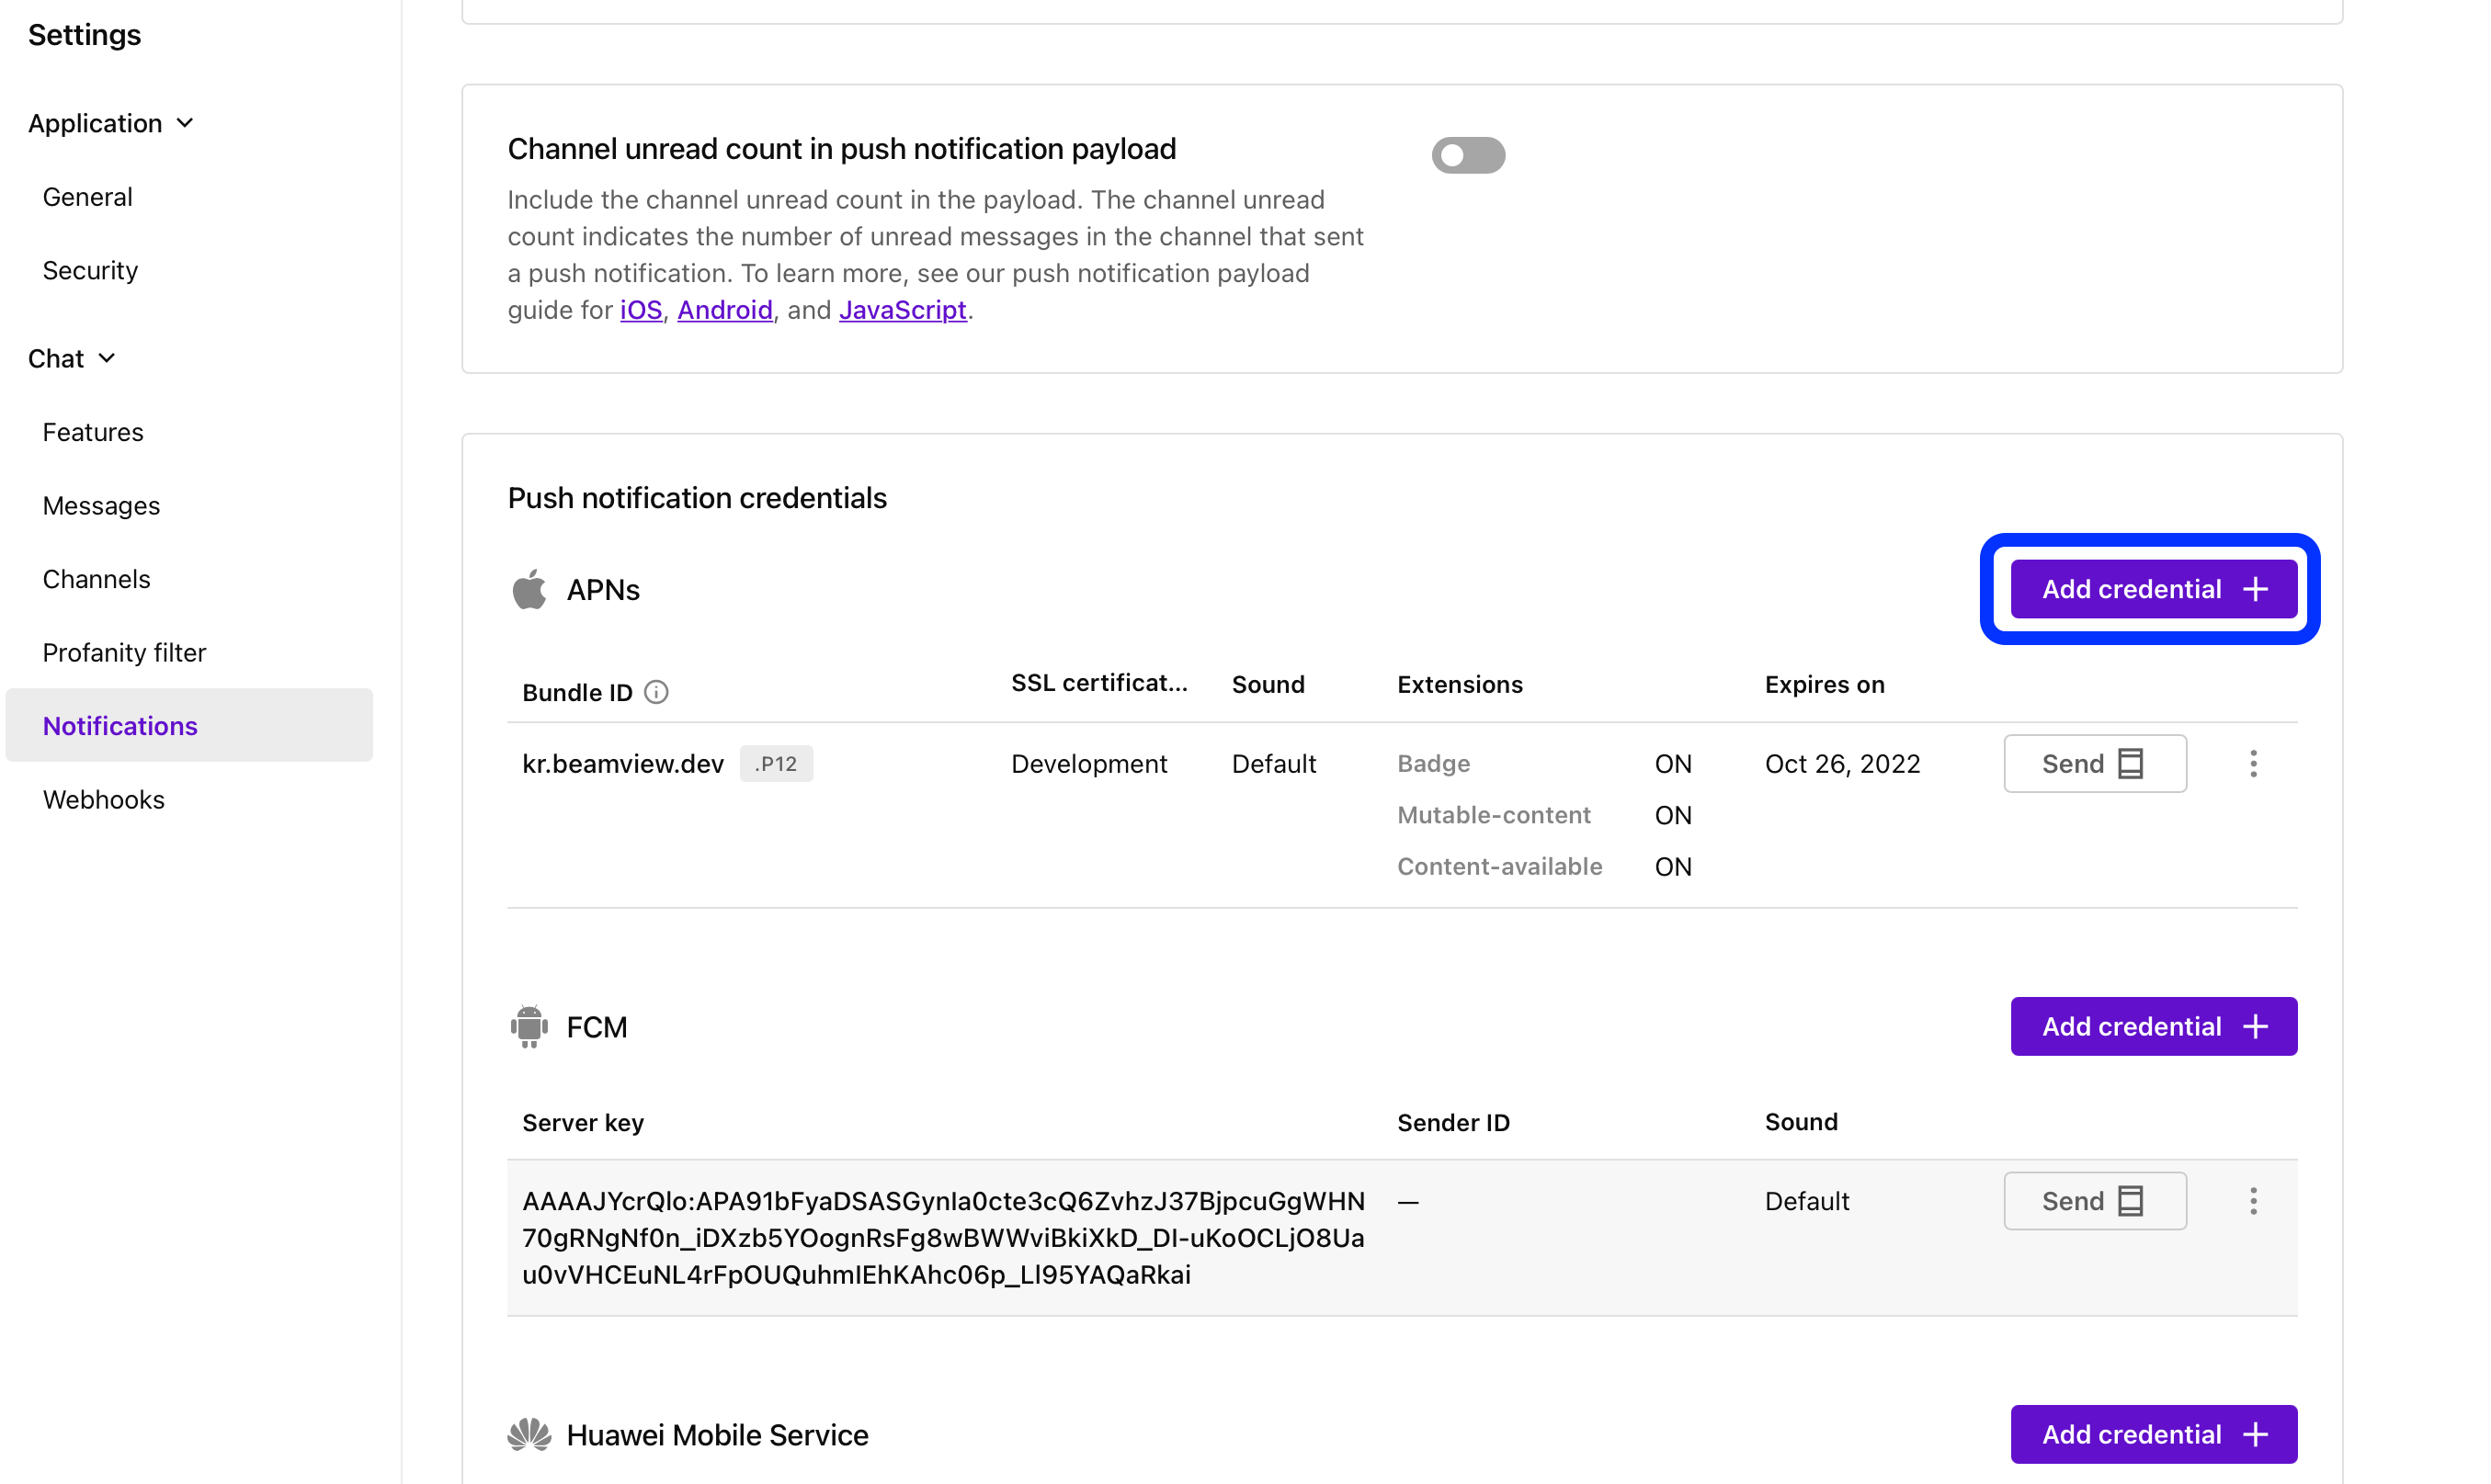
- 'Format'을 '.p12'로 선택하고 'Choose File'버튼을 클릭해서 앞서 저장한 .p12 파일을 업로드 한다.

- 기타 설정을 마무리한다.
- Password는 .p12를 저장할 때 항목을 보호하는 데 사용할 암호를 입력하지 않았다면 비워둔다.
- SSL certificate type은 APN Certificate를 발급받을 때 선택한 것과 동일하게 선택한다.
4. Sendbird Server에 Device Token 등록하기
1. UIApplication.shared.registerForRemoteNotifications 함수 호출하기
- 위 함수를 호출해야 Push Noti에 사용할 Device Token을 발급받을 수 있다.
- 적절한 위치에 다음 코드를 작성한다.
// Swift
let center = UNUserNotificationCenter.current()
    center.delegate = self

    let authOptions: UNAuthorizationOptions = [.alert, .badge, .sound]
    center.requestAuthorization(options: authOptions) { (granted, error) in
      center.getNotificationSettings(completionHandler: { (settings: UNNotificationSettings) -> Void  in
        guard settings.authorizationStatus == UNAuthorizationStatus.authorized else {
          return;
        }
        DispatchQueue.main.async {
          UIApplication.shared.registerForRemoteNotifications()
        }
      })
    }
- 빔뷰의 경우는 App Delegate 내에,
application:didFinishLaunchingWithOptions함수 안에서 registerForRemoteNotification 함수를 호출한다.
2. application:didRegisterForRemoteNotificationsWithDeviceToken 함수 작성하기
registerForRemoteNotifications함수가 호출되면, App Delegate내에서 이 함수가 호출되는데, parameter에 device token이 전달되므로 이를 Sendbird에 등록할 수 있다.- 예시 코드
// AppDelegate.swift
func application(_ application: UIApplication, didRegisterForRemoteNotificationsWithDeviceToken deviceToken: Data) {
    // Sendbird server에 Device Token을 등록합니다.
    SBDMain.registerDevicePushToken(deviceToken, unique: true, completionHandler: { (status, error) in
        if error == nil {
            // Device Token이 정상적으로 등록된 경우
        }
        else {
            if status == SBDPushTokenRegistrationStatus.pending {
                // Device Token 등록이 지연된 경우
            }
            else {
                // Device Token 등록이 실패한 경우
            }
        }
    })
}
- Device Token 등록이 지연되는 경우는 보통, Device Token Register가 비동기적으로 진행되기 때문에,
SBDMain.connect보다 먼저 실행되는 경우가 있어 발생한다. - 이 경우,
SBDMain.getPendingPushToken()을 통해 Device Token을 전역에서 받아올 수 있다. - 그렇기 때문에
SBDMain.connect를 App Delegate내에서 실행하지 않고 나중에 실행할 때,connect함수의 completion Handler에서 이 토큰을 이용해 Device Token을 등록할 수 있다. - 예시 코드
// Swift
SBDMain.connect(withUserId: USER_ID, completionHandler: { (user, error) in
    if error == nil {
        SBDMain.registerDevicePushToken(SBDMain.getPendingPushToken()!, unique: true, completionHandler: { (status, error) in
            ...
        })
    }
})
5. Notification Payload Handling
1. center:didReceive:withCompletionHandler함수 작성하기.
- 앞서
UIApplication.shared.registerForRemoteNotifications를 호출할 때UNUserNotificationCenter를 함께 설정해 두었기 때문에, 사용자가 Noti를 클릭하면 위의 함수가 호출된다. - 이 함수 내에서
response.notification.request.content.userInfo로 payload를 받아올 수 있다. - payload에서 sendbird 객체를 받아올 수 있고, sendbird 객체 내의 구조는 다음과 같다.
{
    "category": "messaging:offline_notification",
    "type": string,                 // Message type: 'MESG', 'FILE', or 'ADMM'
    "message": string,              // User input message
    "data": string,                 // Custom data field
    "custom_type": string,          // Custom message type
    "message_id": long,             // Message ID
    "created_at": long,             // 13-digit timestamp
    "app_id": string,               // Application's unique ID
    "unread_message_count": int,    // Total number of new messages unread by the user
    "channel": {
        "channel_url": string,      // Group channel URL
        "name": string,             // Group channel name
        "custom_type": string       // Group channel custom_type
    },
    "channel_type": string,         // The value of "channel_type" is set by the system.
                                    // The 'messaging' indicates a distinct group channel
                                    // while 'group_messaging' indicates a private group channel
                                    // and 'chat' indicates all other cases.
    "sender": {
        "id": string,               // Sender's unique ID
        "name": string,             // Sender's nickname
        "profile_url": string       // Sender's profile image URL
    },
    "recipient": {
        "id": string,               // Recipient's unique ID
        "name": string              // Recipient's nickname
    },
    "files": [],                    // If a message is a file link,
                                    // this array represents files.
    "translations": {},             // If a message has translations,
                                    // this dict has locale:translation.
    "push_title": string,           // Title of a notification message that can be
                                    // customized in the Sendbird Dashboard
                                    // with or without variables
    "push_sound": string,           // The location of a sound file for notifications
    "audience_type": string,        // The type of audiences to receive notifications
    "mentioned_users": {
        "user_id": string,                      // The ID of a mentioned user
        "total_unread_mention_count": int,      // The number of messages which
                                                // a user has been mentioned
                                                // but has not read within the channels
        "channel_unread_mention_count": int,    // The number of channels with messages
                                                // which a user has been mentioned
                                                // but has not read
        "is_hidden": boolean                    // Whether or not a mentioned user has
                                                // hidden the channel from the list
    },
    "channel_unread_count": int // Total number of unread new messages
                                // from the specific channel
}
- 아래는 payload에서 channel Url에 접근하는 예시코드이다.
// AppDelegate.swift
func userNotificationCenter(_ center: UNUserNotificationCenter, didReceive response: UNNotificationResponse, withCompletionHandler completionHandler: @escaping () -> Void) {
    if let userInfo = response.notification.request.content.userInfo as? [String : Any],
       let sendbirdDict = userInfo["sendbird"] as? [String : Any],
       let channelDict = sendbirdDict["channel"] as? [String : Any],
       let channelUrl = channelDict["channel_url"] as? String {
        print(channelUrl)
       }
}